Friday, 1 February 2013

Pure Nail and Cuticle Oil - 3 Day Challenge Results

So you may have seen my first post about the challenge here. If not then basically on Sunday night I started a 3 day 'Let's Get Naked' challenge using the Pure Oil from Simple Nail Art Tips. This challenge involved keeping your nails bare for a total of 3 days and applying the oil frequently throughout the day in order to hydrate them.

If you didn't see the other post then before you continue please have a look at it here. Basicallly, my nails are generally pretty good but the main problem I have tend to be related to brittleness. I often get the corners cracking off my nails because they are brittle, now I don't expect that to be solved in 3 days (I will continue using the oil and update you about that in a month), so what difference can 3 days make?

You need to take a look at the pictures below. When using this oil I applied it as directed, just slopping it on the nails and surrounding skin and when it was absorbed doing that again. I wasn't pedantic about this and I have a job where I can't keep the oil on all the time, so for an afternoon and a whole day of this challenge I had to continually wash my hands (I work in healthcare), so I was probably a bit of a brutal challenger.

Now, just so you know, I do look after my hands. I use Lush Lemony Flutter Cuticle Butter which I really like twice a day most days and then the odd bit of CND Solar oil here and there, as well as hand cream as often as I can, so I am no stranger to cuticle oils etc. I thought because of this I might not get as much of a result as some other ladies who might not do this as religiously as I do. I do tend to have very dry skin though that is certainly a factor against me and something that probably contributes to the brittleness of my nails.

So let's take a look at my results......


AFTER:
This is after the 3 days. Take a look at the before picture below. You can see the dryness has gone and those little scratches on the nail have disappeared. I also lost the broken bit of nail that the patch was holding on the index finger, but that's ok, it was bound to happen.
 
BEFORE:


AFTER:
Again, after the 3 days. Pay particular attention to the cuticles on the middle and ring fingers.

BEFORE:


AFTER: Yes there is some cuticle which need to be pushed back. I didn't want to do that before these pictures so I could show you the results 'untouched'. The day after I took the photo under this one (start of the challenge) that bit of dry skin you can see sticking up was really sore and inflamed. Within a day it was totally gone. I don't know how but it was.

BEFORE:


AFTER: OK, so here I had a break really low down on the nail. Ouch, they hurt and I get them quite often. I can usually keep them going until the nail grows up enough for me to file by using some nail glue or a patch. You can see a little nail glue around that split, but funnily enough it has come off the actual split itself (typical!). I can barely notice the split on my nail anymore.


BEFORE: It was really dry and I thought it was going to catch on something and rip across. I think this may be one of the areas with the most noticable improvement to the nail. I am really impressed with this one.


AFTER: Look at the photo before, all that dry skin has gone. You can see I need to push the cuticle back, for some reason this one grows that fastest. Even the texture of the skin has changed.


Now, there is one more thing that I would like to mention that I don't have photographs to show. Do you ever get the skin on the inside of the fingernail growing up with the nail? I do. It's really weird and I only get it on certain nails. If you look very carefully at the nail line on my first photograph in this post you can see that some of them are almost a V shape, particularly the middle and ring fingers, that is the attached bit of skin on the other side shining through the nail. This bit of skin is really hard to deal with, because it is really sensitive and hard to push back. Years ago when I used to have acrylics on they used to use the little drill on these and they would be gone (yuck!). Well, the reason I am talking about these is that I have been putting the oil on the underside of the nail too and it has really softened these bits of skin so that I can gently push them back. They are not completely gone right now but I am working on them which is quite a relief.

So, at the end of this challenge what do I think? To be honest I was hoping for a miracle but not expecting much, I have used OPI and CND cuticle oils and we all know they are good quality, also I dodn't think my nails were in too bad a shape to start with. Well, I am very impressed with Pure Nail and Cuticle Oil I have to say. I really like it, it feels less thick and sticky than other oils I have tried and it has a pleasant scent, but the thing that has made the difference is that it sinks in quite easily, it almost has a finer texture if that's possible. I am really pleased with the results and I am going to continue using this oil several times a day when I am wearing polish. My job dictates that most weeks I have at least 2 days naked so those will be good for me to work on my nails with this oil too.

I really like these short term results but I am even more interested to see what happens to the nail as it grows out while I'm using this oil. What I am hoping for is less brittleness and hopefully less curling on specifically the index fingers, as these are the most brittle. I don't know if that is possible but I will be updating you in a month as to my progress.

In case you were wondering how much oil I used up in the challenge I thought I would show you. I used mainly the bottle as it was just easy for me. Now, for 2 days I applied it really liberally to the whole of my finger, right up to the knuckle on my hand. Ana at Simple Nail Art Techniques doesn't tell you to do this but my skin was so dry I wanted to. Also I took this picture after I had been using the oil for 4 and a half days (the other photo's were at exactly 3 days), so this is more than 3 days worth. I would imagine with normal use it would last at least a couple of months.


If you would like more information then please take a look here. A starter kit is $24 with free domestic shipping which I think is a pretty good deal. The only sad thing is that if you are international the shipping is pretty high now since USPS changed their rates last week. It might work out cheaper to club together with a few friends and do a group order to split shipping.

As I said I will be posting updates about my use of this oil so keep an eye out.
x

Wednesday, 30 January 2013

Ninja Polish Girly Floam

It's midweek finally, my most tired day of the week and as I'm still naked (see Monday's post!) I thought I would show you something fun that I wore a few weeks ago. I'll be posting my results for the naked challenge tomorrow so you can see for yourselves.

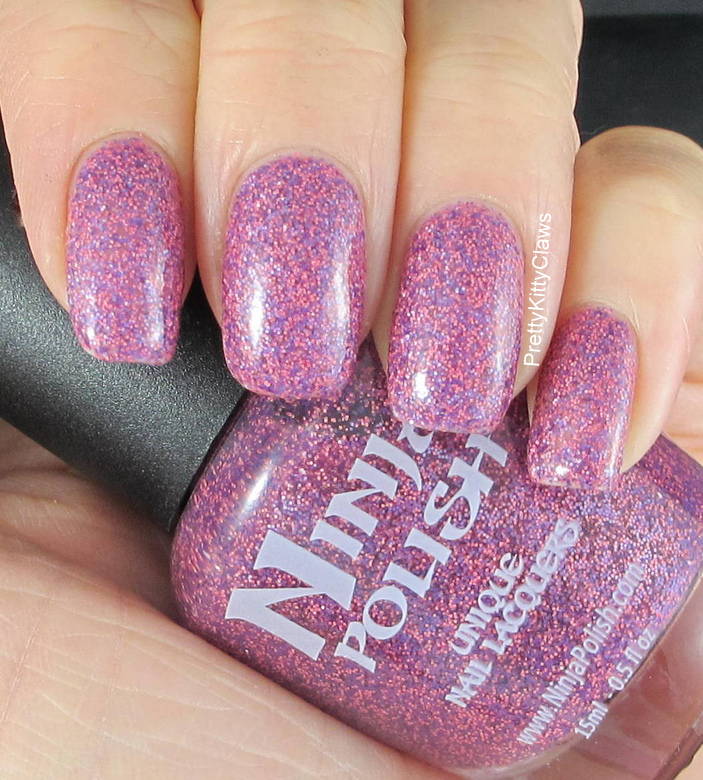
During this bleak midwinter I wanted to wear something girly and fun and as this has been sitting in my untrieds for a few months out it came. Ninja Polish Girly Floam is a matte pink and purple fine glitter in a clear base. For this mani I used it alone and it took 3 coats to reach full opacity.

As everyone who has worn Floam knows, it is one hard polish to remove so I thought there would be no better time to try the PVA basecoat method we've all been hearing about. I've been a bit wary of this method just because I don't really like the thought but then again the thought of removing Flaom was enough to push me into it!

The PVA basecoat method was reasonably straightforward but the only thing that puts me off using it again is that I was tempted to pick at it most of the time it was on my nails and I'm not even a picker! It was particularly soft after a shower so that would be a good time to take then off if you have more willpower than I do.

Anyway, on to the swatches:


Look at that shimmer!

 Now, before I took off this mani I had a little practice at stamping, I still need lots more but here are some of the nails I was able to peel off when I wanted to remove the mani. Really it was easy but I will probably be reserving this method for really hard to remove polish. These look a bit creepy don't they??!!
 
x

Tuesday, 29 January 2013

OPI Spotted and Colour Club Halo Hues

As you might have noticed I have quite a stash to choose from and so I only tend to wear things again if I really like them, or I mess them up the first time and feel I should give them another chance to impress me. Today's post is a little bit of both.

This mani is an older post that I had stored for you, if you read my blog post yesterday than you'll know that I'm doing the 3 day Pure Oil Naked Challenge. It's going well and I'll be posting my results on Thursday.

So you may remember my first attempted at OPI Spotted? If not you can see the post here. Well that was my first time and I tried really hard not to use too much and just end up with black nails, well I had the opposite problem and didn't use enough so I got drag marks instead. Hmmmm, back to the drawing board.

This time I decided to try Spotted over the Color Club 2012 Halo Hues. I stared with a base of randomly placed Halo Hues so I could get a multicoloured effect through the Spotted. I just painted on lines and blobs (yes that is a technical term!) and the applied a thin layer of Spotted over the top. I was careful to float my HK Girl topcoat over the top so I didn't smudge

I really quite liked this mani, the pictures don't quite do it justice but the holo really shone out behind the Spotted. I'd like to try it again with some brighter holo's next time!


x

Monday, 28 January 2013

Pure Nail and Cuticle Oil - 3 Day Challenge

So today I have something a bit different to show you. It's not a swatch but it's a nail care oil called Pure Nail and Cuticle Oil made by Ana at Simple Nail Art Tips. If you haven't heard of it she has been calling for people to do a 3 day 'Let's Get Naked' Challenge. This challenge basically involves 3 days with naked nails and following Ana's initial hydration process with her Pure oil.

I first came across this page and product from a blogger friend who is participating in the challenge. I read her post and the link to the Simple Nail Art Tips site and I was amazed. You can check out the site here at: http://www.simplenailarttips.com/products/pure-cuticle-oil and on facebook here. The article gives a lot of really useful information and demonstrates Ana's personal experience of her product. The results she has had look great and as she was having a sale I had to try it.

The concept is basically that for the first 3 days of this treatment you must have bare nails and apply the oil frequently throughout the day, reapplying when it has been absorbed into the nail. After these 3 days you can go back to wearing polish and using the oil a few times a day. Please read the link above for a full explanation, it'll have you reaching for the cuticle oil I can tell you that!

One thing I absolutely loved about this company is that Ana gives out her recipe for the oil on the site. She is so confident in the product and that you will love the convenience and the essential oils she adds to her blend that you will like to buy from her, and if you can't afford to you can try and pick up the ingredients to blend at home. In fact, that was probably one of the reasons I decided to purchase the oil to try myself.

The oil is mixed in small batches and contains only Jojoba oil, Grape Seed oil, Olive oil, Vitamin E, Vitamin A and essential oil blend and Tea Tree oil. It smells divine and is quite subtle, certainly not overpowering.

So, here I am with the 3 day naked challenge. All polish came off last night and I took photo's of my bare nails. Now, when you look at these they will certainly not be the best or the worst. I have always had really dry hands and my job means that I can wash my hands or use alcohol gel upwards of 20 to 40 times a day, because of this I am really careful to try and moisturise and use cuticle oils and creams. Although I do that I still get dry cuticles and skin, and my nails can be quite brittle. I have taken quite close up photos of my fingers and the problem areas to point out the bits I am hoping to 'fix' with this oil.

I purchased an introductory pack and received a 15ml (0.5fl oz) of Pure oil, a 2 ml Pure oil pen, a few samples of other scents and an instruction leaflet. It arrived speedily to my door from the US to the UK within a week!

So here's what I got in the introductory pack:


Here are the directions:


And here are my nails:
This is the left hand - OK they are not in too bad a state but the could be better. You can see the dry skin, particularly flaking on the inside of the index finger.

Also can you see that line on the outside of the index finger nail on the corner? That is a split in the nail which I have patched and glued. This particular nail on both hands really curves inwards, which I hate. They commonly break here too as evidence in the photo. I wonder if using an oil over the long term wil help?


This is the index finger of my left hand above - dryness and flaking at the cutcile and side wall. It was also inflammed and itchy when I woke up this morning.


My right hand: again some dryness at the cuticles and on the sidewall of some nails


This is my middle fingernail on the right hand above. See that split so low down - ouch! I really do believe these are caused by dryness and brittleness of the nail. I get them quite a bit.

I find that of all my fingers my right thumb nail cutcile grows the fastest, because of this I push it back more than the other nails and it often gets thicker and dry as you can see below.


So that's day 1 of my Pure Oil challenge. I will be using it as directed and taking pictures to update you. I think I may keep the results a surprise until the end of the 3 days - so that's Wednesday. Wish me luck!
 
x

Sunday, 27 January 2013

Nails Inc Paulton's Square

I have a very pretty polish to show you today and a bit of a sad polish related incident too (no, it's not Royal Mail related so you are safe to read on!). Firstly the polish.

This beauty you see below is Nails Inc Paulton's Square. I got this in a kit of 4 from QVC called the Stardust collection which you can see here. Unfortunately this kit is no longer available and it was only offered for sale maybe twice before it sold out and never came back, I really do hope it is restocked.

The best description of Paulton's Square I can give is a shimmery duochrome flakie glitter. It's amazing in the bottle and amazing on the nail. Unforutnately my bottle broke when trying to open it (see pictures below) so I had to decant what I could into a spare bottle, thank goodness I had one on hand!

For this mani I used one coat of Barry M Cobalt Blue as a base (great formula and a one coater!) and 2 coats of Nails Inc Paulton's Square, although one would have been absolutely fine. I really love this polish, I was staring at it all day and I don't want to take it off for work tomorrow. Boo.

Anyway, on to the swatches:


Look what happened. I'm so sad and I don't think I can get another one although I am going to message Nails Inc and see if there's anything they can do or if they are planning on releasing it. At least I managed to salvage most of it.


My poor hubby cut his hand in the process. When I head it 'pop' my first reaction was for the polish, oh dear, I need to be a better wife.......

Tomorrow I will have a very different type of post for you so make sure you keep an eye out for that!
x